MEASURE. FIT. GET OUTSIDE.

iGrip shoe
& boot studs.
Your fitting guide.

Add winter grip to running shoes, hiking boots and work boots with reusable iGrip SS screw-in studs. Compare five models, choose by outsole thickness and follow the fitting steps.

Five SS models. One clear route from measuring to removal.

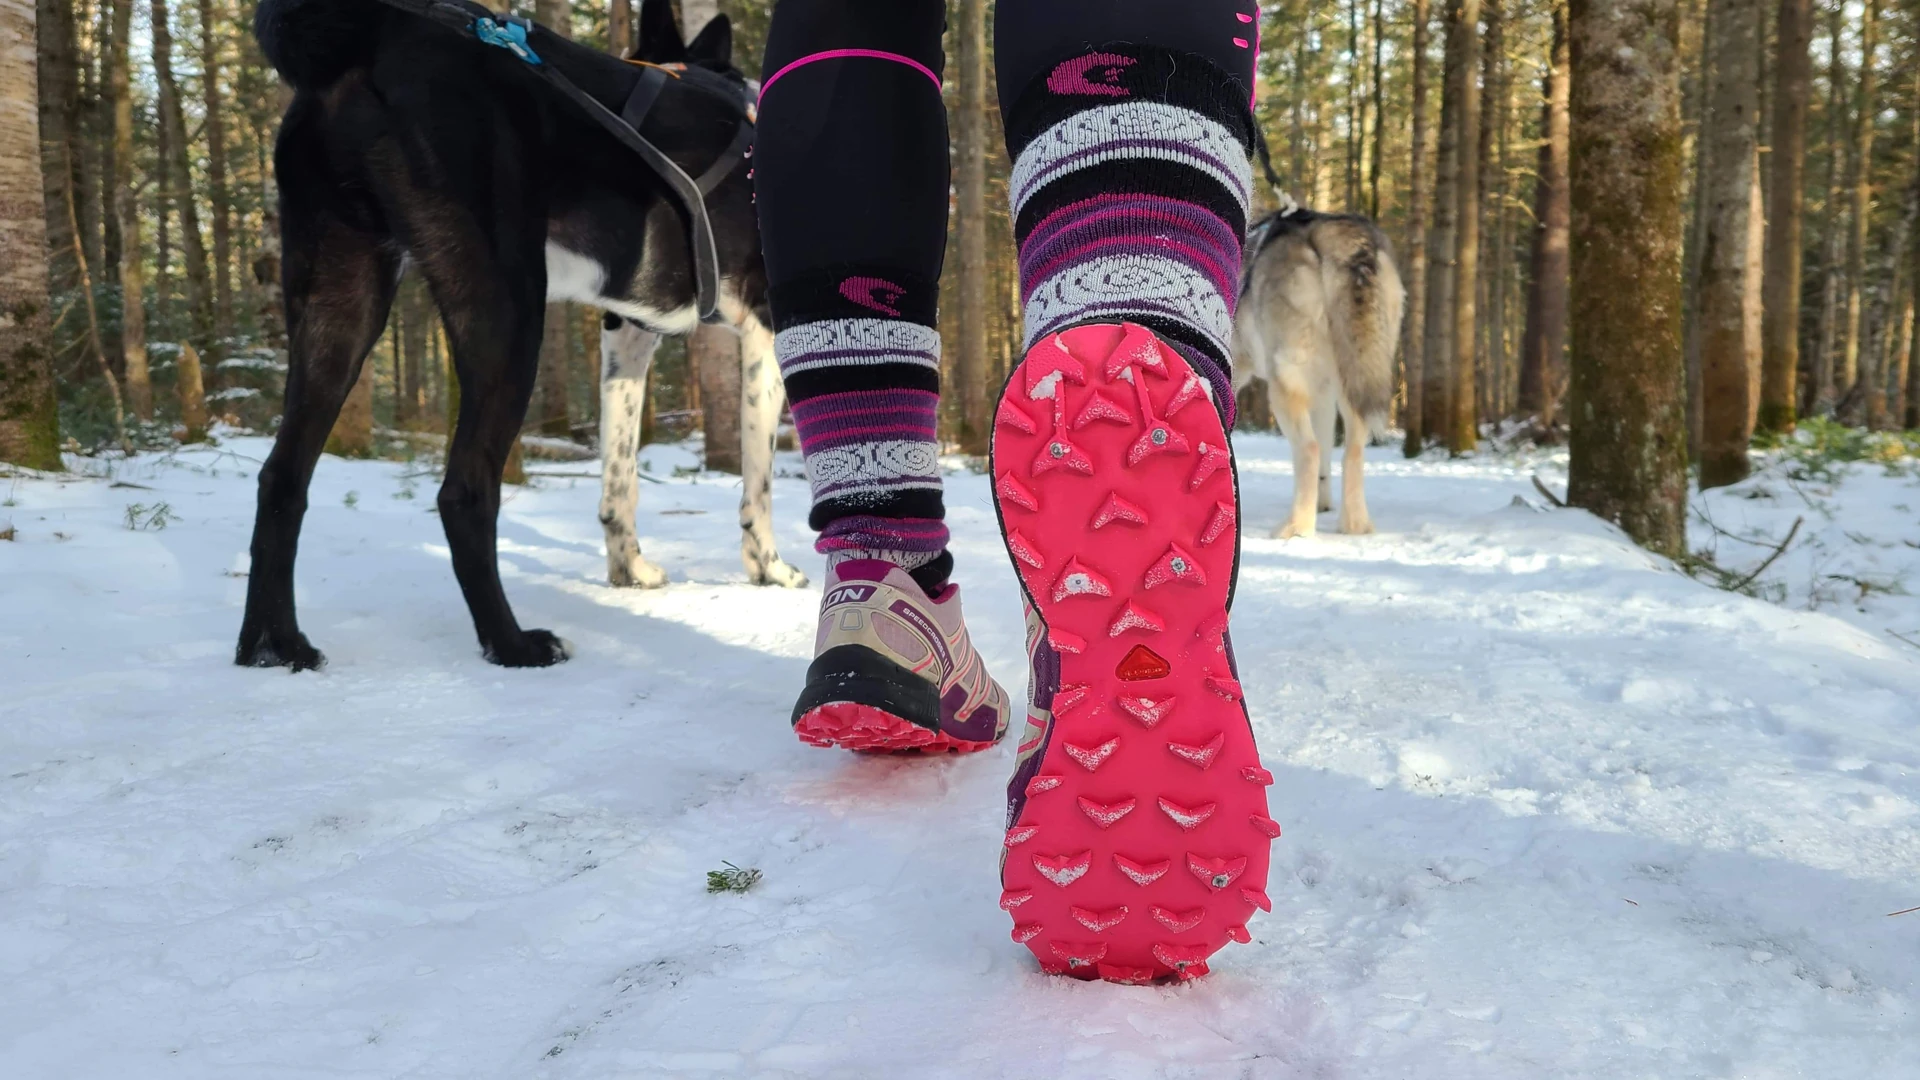
Studded running shoe in a snowy forest
Built into your outsole.
01MeasureActual outsole rubber. Each location.↗02ChooseInsertion depth + 2 mm.↗03Count & placeHeel and forefoot.↗04InstallSeat the shoulder flush. Stop.↗

THE FITTING ESSENTIALS

Choose by sole thickness.
Fit for winter grip.

iGrip SS studs screw into the raised tread lugs of suitable shoe and boot outsoles. Their supporting shoulder sits flush with the outsole surface, while the tip remains exposed for traction.

Which size?
Match insertion depth to the measured outsole thickness, then allow an extra 2 mm. Compare all five SS models ↗
How many?
Start with the experience-based recommended minimum of 24 studs per pair — 12 per shoe. Plan your stud positions ↗
Can I reuse them?
Yes. Remove, inspect and refit sound studs in another suitable pair. See removal and reuse ↗

01 / FIND YOUR FIT

Which iGrip studs fit your shoes?

A model name is not a measurement.
Enter the verified outsole thickness at the stud installation point.

mm

Measure continuous, solid outsole rubber only. Exclude foam and insoles. How to measure ↗

YOUR STARTING POINT

Measure first.
Then choose.

We will show only models that pass this guide’s thickness rule, plus the next checks for your footwear.

Thickness check: insertion depth + at least 2 mm of untouched outsole rubber. The part outside the sole is excluded. This allowance is based on practical fitting experience. It does not assess outsole rubber strength, internal construction or footwear certification.

02 / THE +2 MM RULE

How thick does
your outsole need to be?

Measure the solid rubber of the outsole — the bottom of your shoe.
Exclude the insole and soft midsole.

Verified outsole thickness≥Insertion depth+2 mm
Sole cross-sections with the shoulder embedded flush with the outsole surface, comparing sufficient outsole rubber thickness and reserve with a too-thin location
Tap or click the diagram to enlarge. Only the length inside the outsole needs room in the sole. SS-06 example: 10 mm overall − 2 mm outside = 8 mm inserted; 8 + 2 = 10 mm minimum outsole thickness. The shoulder’s outer face must be flush with the surrounding outsole surface. Keep at least 2 mm of untouched material between the inserted end and the shoe interior.
01

Identify the solid outsole

Identify the solid outsole rubber at the stud installation point. This is the rubber bottom of the shoe, including the raised tread lug. Exclude the insole, foam, hollow chambers, waterproof layers and internal safety components.

02

Check what you can measure

A depth gauge can measure a lug above the adjacent groove. That height alone does not prove the total continuous outsole rubber thickness. Use a verified outsole drawing or ask the footwear maker when the inner boundary is hidden.

03

Repeat across the sole

The heel and forefoot can differ. Measure each proposed site. A thinner point needs a new model check; do not average several measurements or drill to find the inner boundary.

A depth gauge bridging an outsole tread lug and measuring the adjacent groove; this is lug height, not total continuous outsole rubber thickness
Tap or click the diagram to enlarge. Repeat at each planned location. A caliper or gauge cannot identify hidden internal layers from outside.
✓ POTENTIALLY SUITABLE

Solid, wide, healthy outsole tread lugs.

Enough verified depth and enough width to support the whole shoulder. A work or trekking outsole must meet these requirements before fitting.

× STOP AND REASSESS

Thin, hollow, damaged or unknown.

A fixing point near an internal layer or the foot, a narrow edge, or an unknown material cannot be cleared by appearance alone.

PATENTED iGRIP TECHNOLOGY

How the SS shoulder
holds the stud in place.

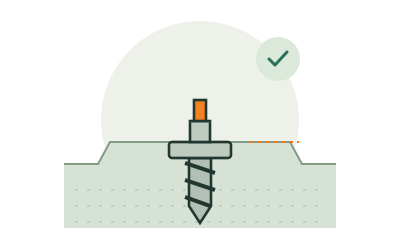
SS means Shoulder Stud. Its distinctive shoulder supports the stud in the outsole rubber, helping protect the outsole and keep the stud firmly seated. The outer shoulder face sits flush with the tread lug.

iGrip SS stud with its shoulder embedded flush with the shoe outsole surface
Tap or click the diagram to enlarge. The SS shoulder supports the stud at the surface to prevent sinking. Together with the threaded anchor, it helps resist movement and pull-out when correctly fitted in suitable outsole rubber.

Protect the outsole

The wider shoulder spreads support around the stud and limits how far it can sink into the outsole rubber. Seat its outer face flush with the tread lug, then stop turning.

Keep the stud stable

The thread anchors the stud while the shoulder supports it at the outsole surface. Together they resist rocking, loosening and pull-out in a correctly prepared tread lug.

Remove and reuse

The accessible head lets the correct iGrip tool engage for removal. Clean and inspect the durable studs, then fit them again in another suitable pair of shoes or boots.

03 / FIVE MODELS. THE FACTS.

Compare iGrip SS stud sizes.

Compare overall length, installed projection and insertion depth.
Only insertion depth + 2 mm sets the thickness threshold.

SS-06

STANDARD
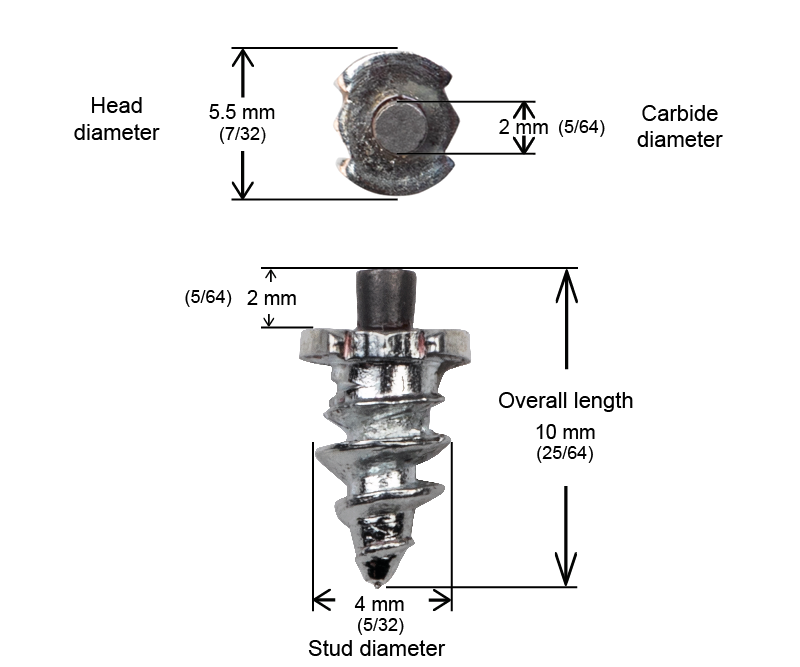
Official SS-06 drawing: 10 mm overall length, 5.5 mm head diameter and 2 mm carbide diameter
10 mmminimum outsole thickness
8 mm inserted + 2 mm

Running & trekking shoes

View SS-06 ↗

SS-06R

POINTED R
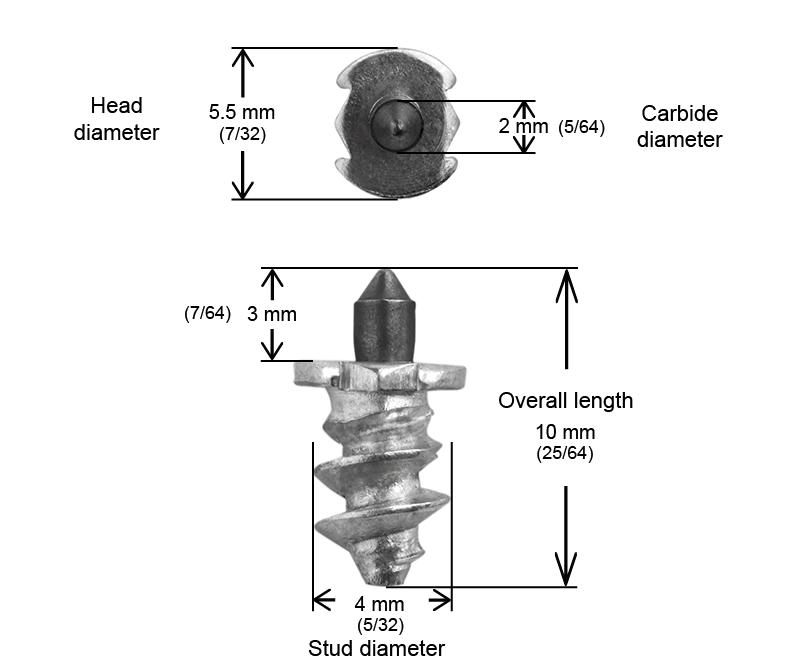
Official SS-06R drawing: 10 mm overall length, 5.5 mm head diameter and 2 mm carbide diameter
9 mmminimum outsole thickness
7 mm inserted + 2 mm

Safety boots in the EU catalogue

View SS-06R ↗

SS-08

STANDARD
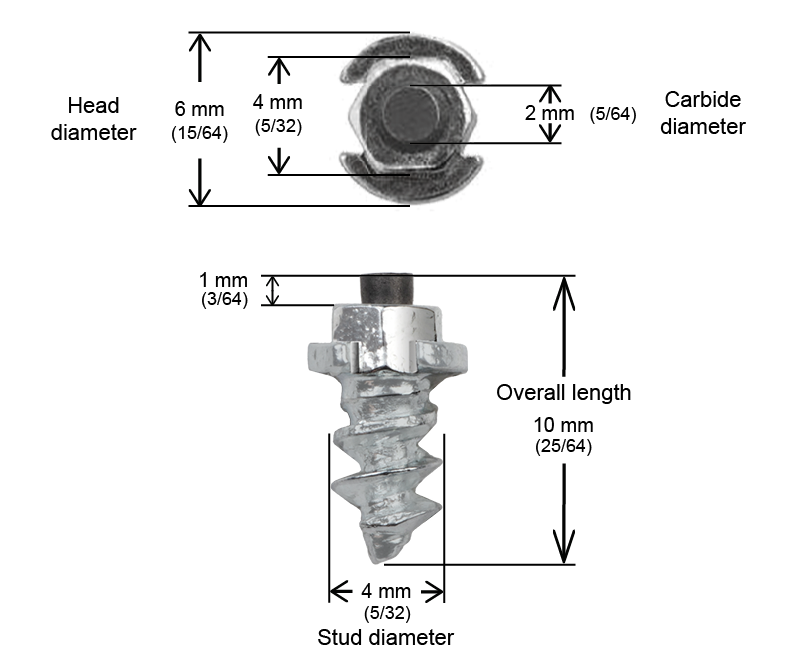
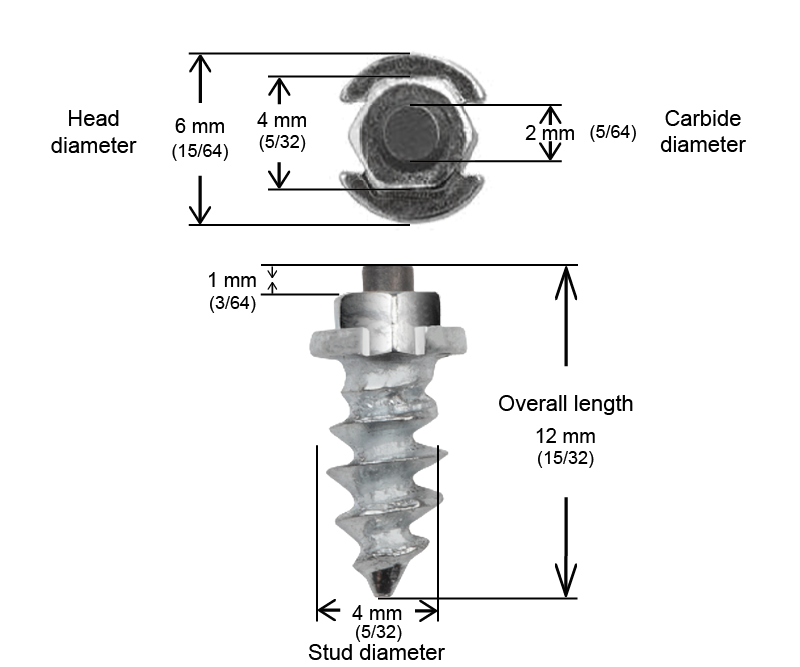
Official SS-08 drawing: 10 mm overall length, 6 mm head diameter and 2 mm carbide diameter
9 mmminimum outsole thickness
7 mm inserted + 2 mm

Running, trekking & safety footwear

View SS-08 ↗

SS-11

STANDARD
Official SS-11 drawing: 12 mm overall length, 6 mm head diameter and 2 mm carbide diameter
11 mmminimum outsole thickness
9 mm inserted + 2 mm

Running, trekking & safety footwear

View SS-11 ↗

SS-11R

POINTED R
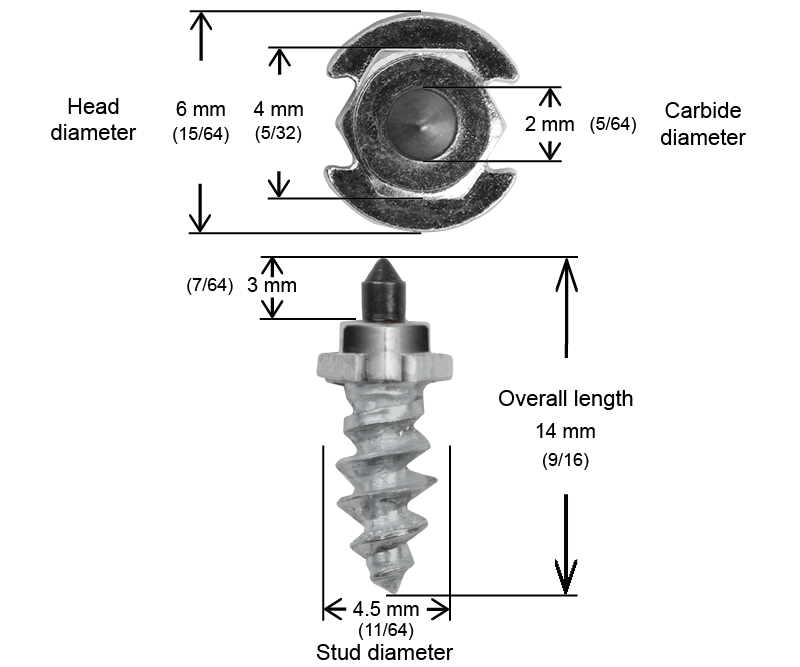
Official SS-11R drawing: 14 mm overall length, 6 mm head diameter and 2 mm carbide diameter
11 mmminimum outsole thickness
9 mm inserted + 2 mm

Safety boots

View SS-11R ↗
Fit check · insertion depth + 2 mm · all values in millimetres
ModelOverall lengthOutside the outsoleInsertion depthMinimum outsole thickness*
SS-06102810
SS-06R10379
SS-0810379
SS-11123911
SS-11R145911
Verified dimensions · all values in millimetres
ModelOverall lengthHead ØStud ØCarbide ØCarbide above metalMinimum outsole thickness*
SS-06 ↗105.542210
SS-06R ↗105.54239
SS-08 ↗1064219
SS-11 ↗12642111
SS-11R ↗1464.52311

*Minimum outsole thickness = insertion depth + 2 mm, following the recommendation based on practical fitting experience. Measure only the continuous, solid outsole rubber at each stud installation point, from the top of the tread lug towards the inner boundary of the rubber outsole. Exclude foam, insoles, cavities and other internal layers. This is not just the lug height above the adjacent groove. Insertion depth = overall length − complete installed projection outside the outsole. Carbide height above the metal head is a separate dimension.

R

R models have a pointed tungsten carbide tip.

The R designation identifies a pointed tungsten carbide tip. SS-06R and SS-11R have this tip shape. All five models have a 2 mm carbide diameter; the R tip differs in shape and height. Choose the model by its insertion depth, installed projection and suitability for your outsole.

04 / COUNT & PLACE

How many shoe studs?
Where should they go?

Recommended minimum: 24 studs per pair.
Start with 12 per shoe, then adapt the positions to your tread lugs.

Install each stud into a raised tread lug.

Tread lugs are the raised outsole rubber blocks on the sole. Each numbered marker sits on one lug. Fit the stud into the top of the block, keeping its whole shoulder within the edges. Leave the recessed grooves between lugs clear.

FOREFOOTContact during push-off
Stud positions on raised tread lugsRaised outsole tread lugs are separated by dark recessed grooves. Every numbered stud position is centred on its own tread lug in the forefoot or heel. The arch and grooves have no stud positions. Use the numbered buttons to select positions.ARCH
HEELContact as you land

YOUR SELECTED LAYOUT

12studs per shoe
× 2
24studs per pair

6 forefoot lugs + 6 heel lugs selected. Match suitable tread lugs on the other shoe.

Use the numbered buttons to select tread lugs. Orange means a planned stud; an unselected lug stays green. Check the width, outsole rubber condition and thickness of every actual lug before fitting.

You will need

24 studs that pass the checks at every selected site, plus the appropriate iGrip tool. One 24-stud pack covers the recommended minimum of 12 per shoe. EU product pages list an installation tool in each box.

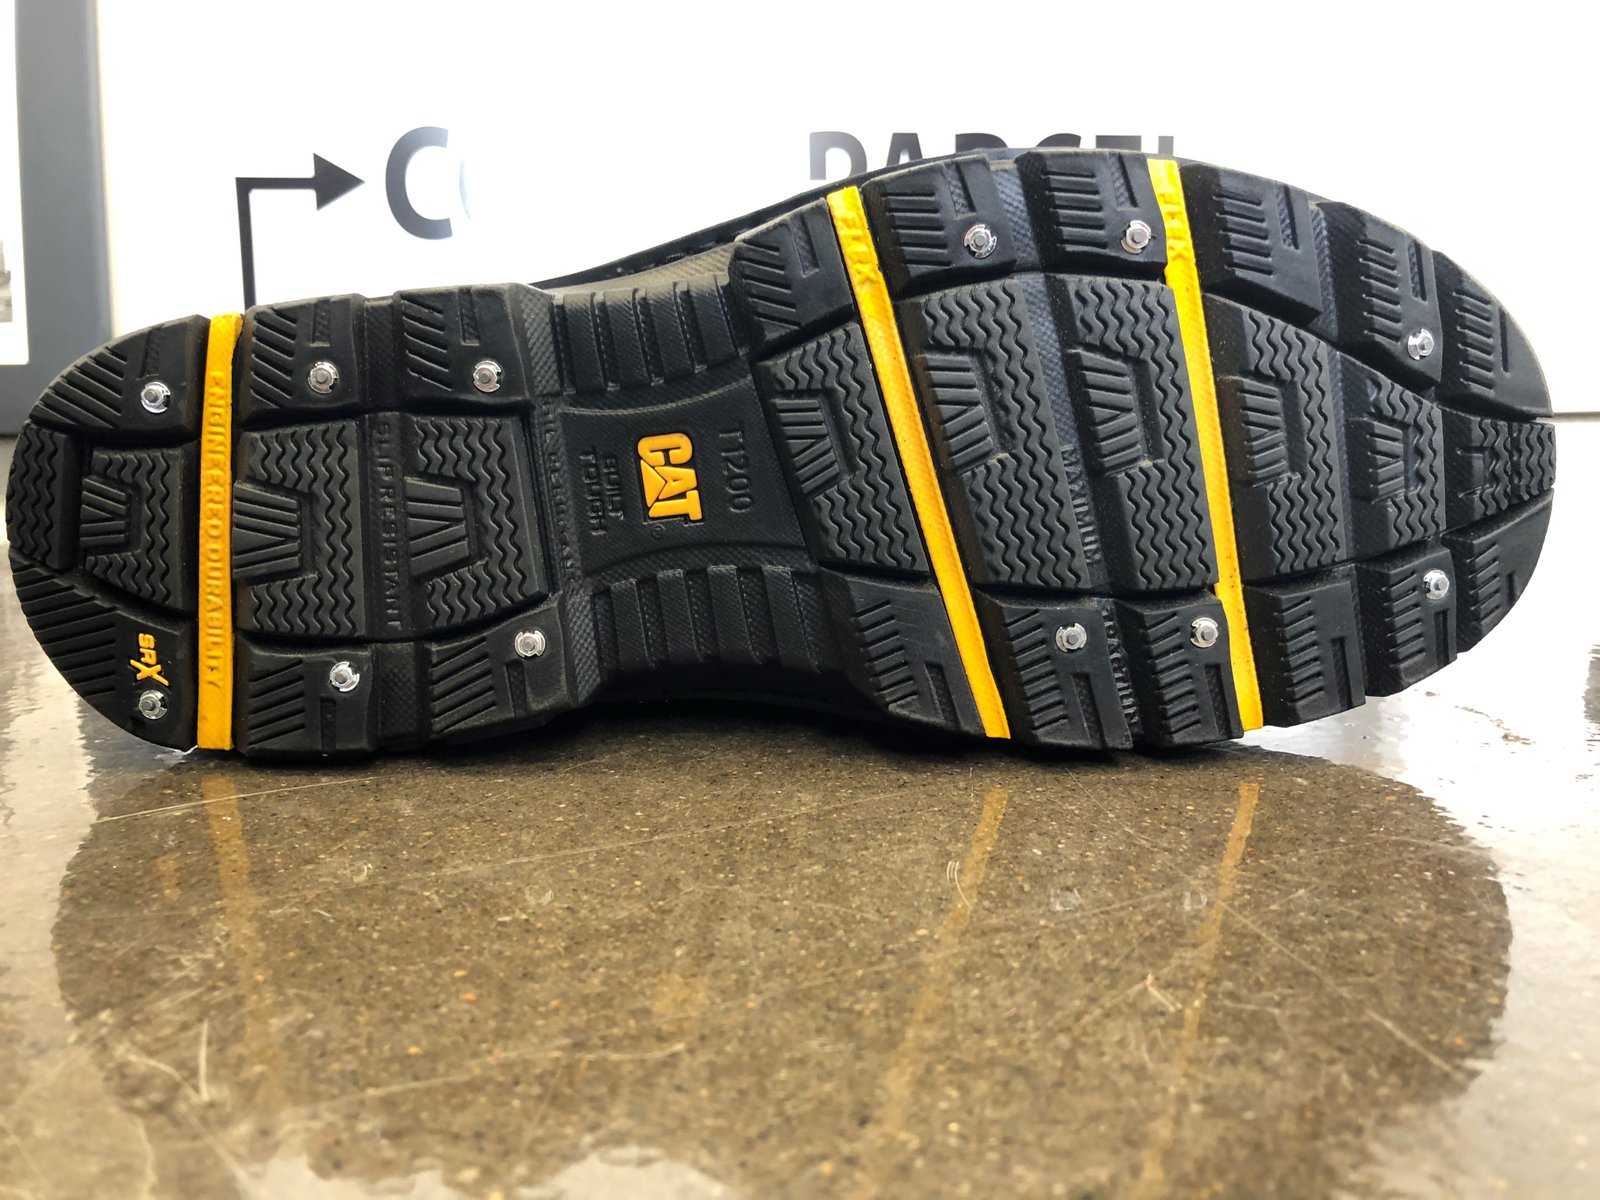
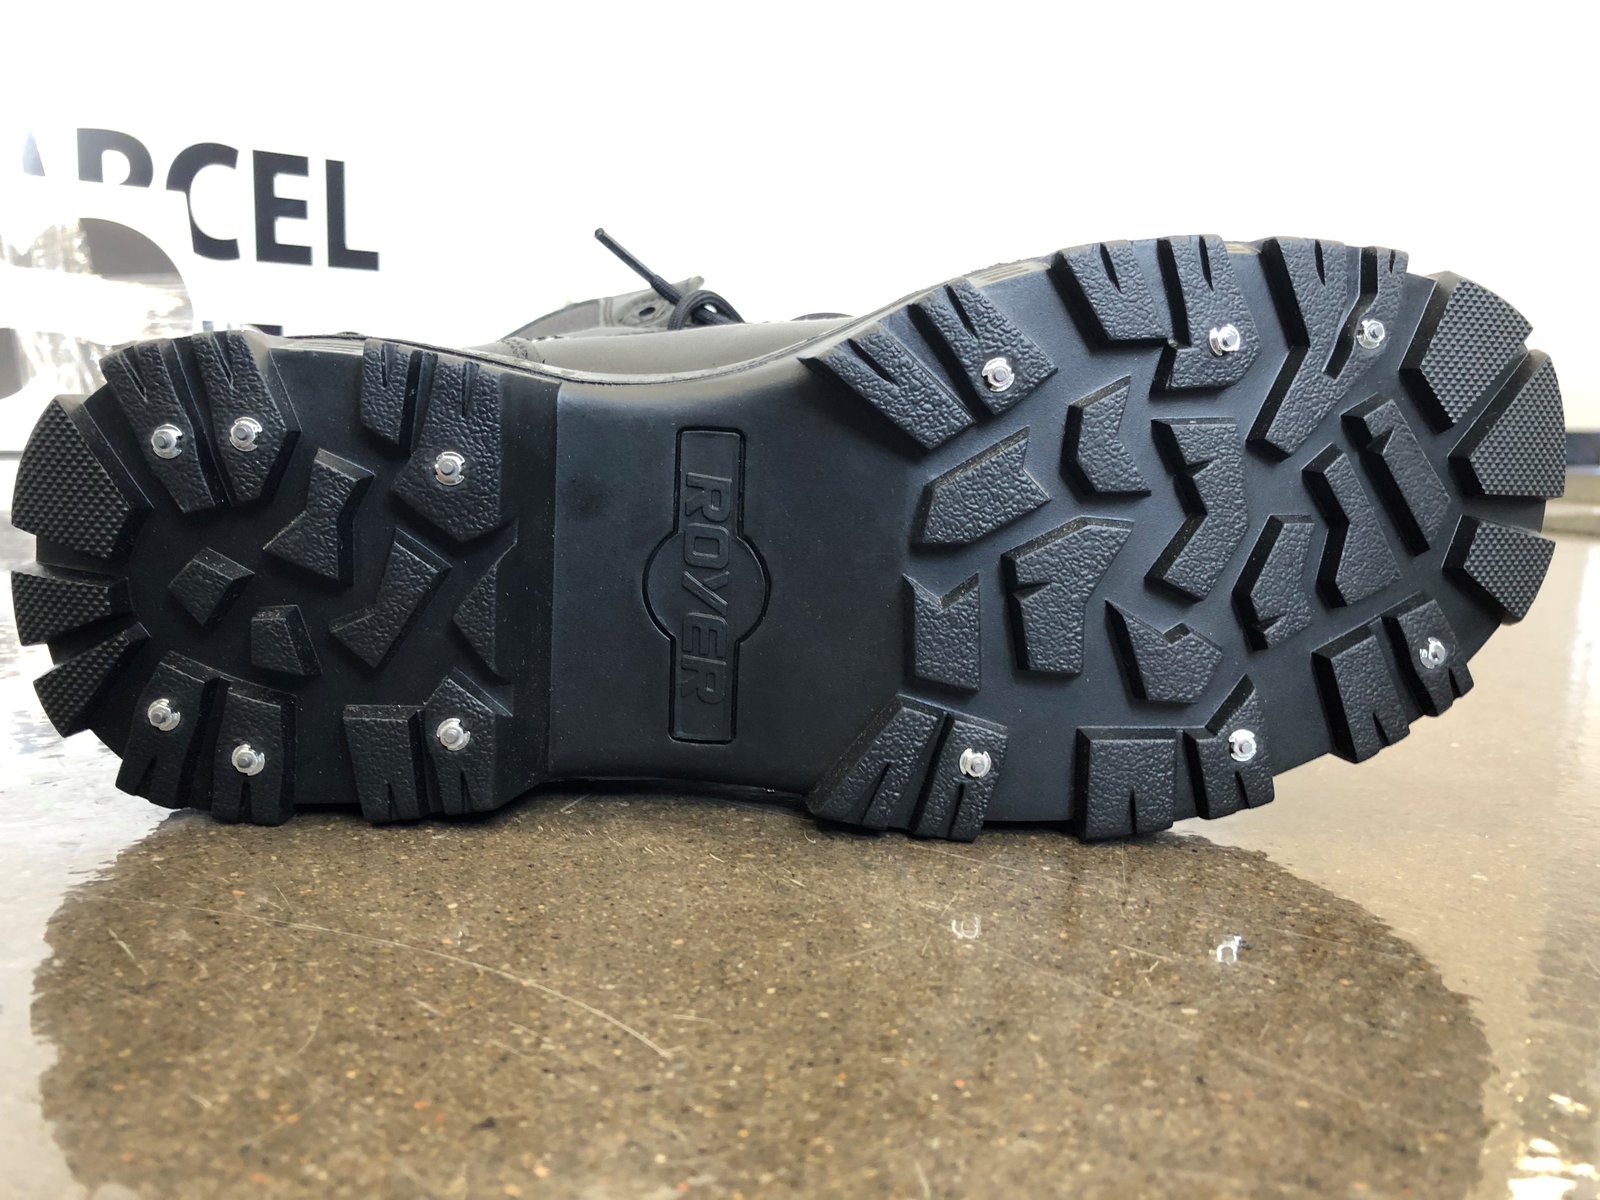
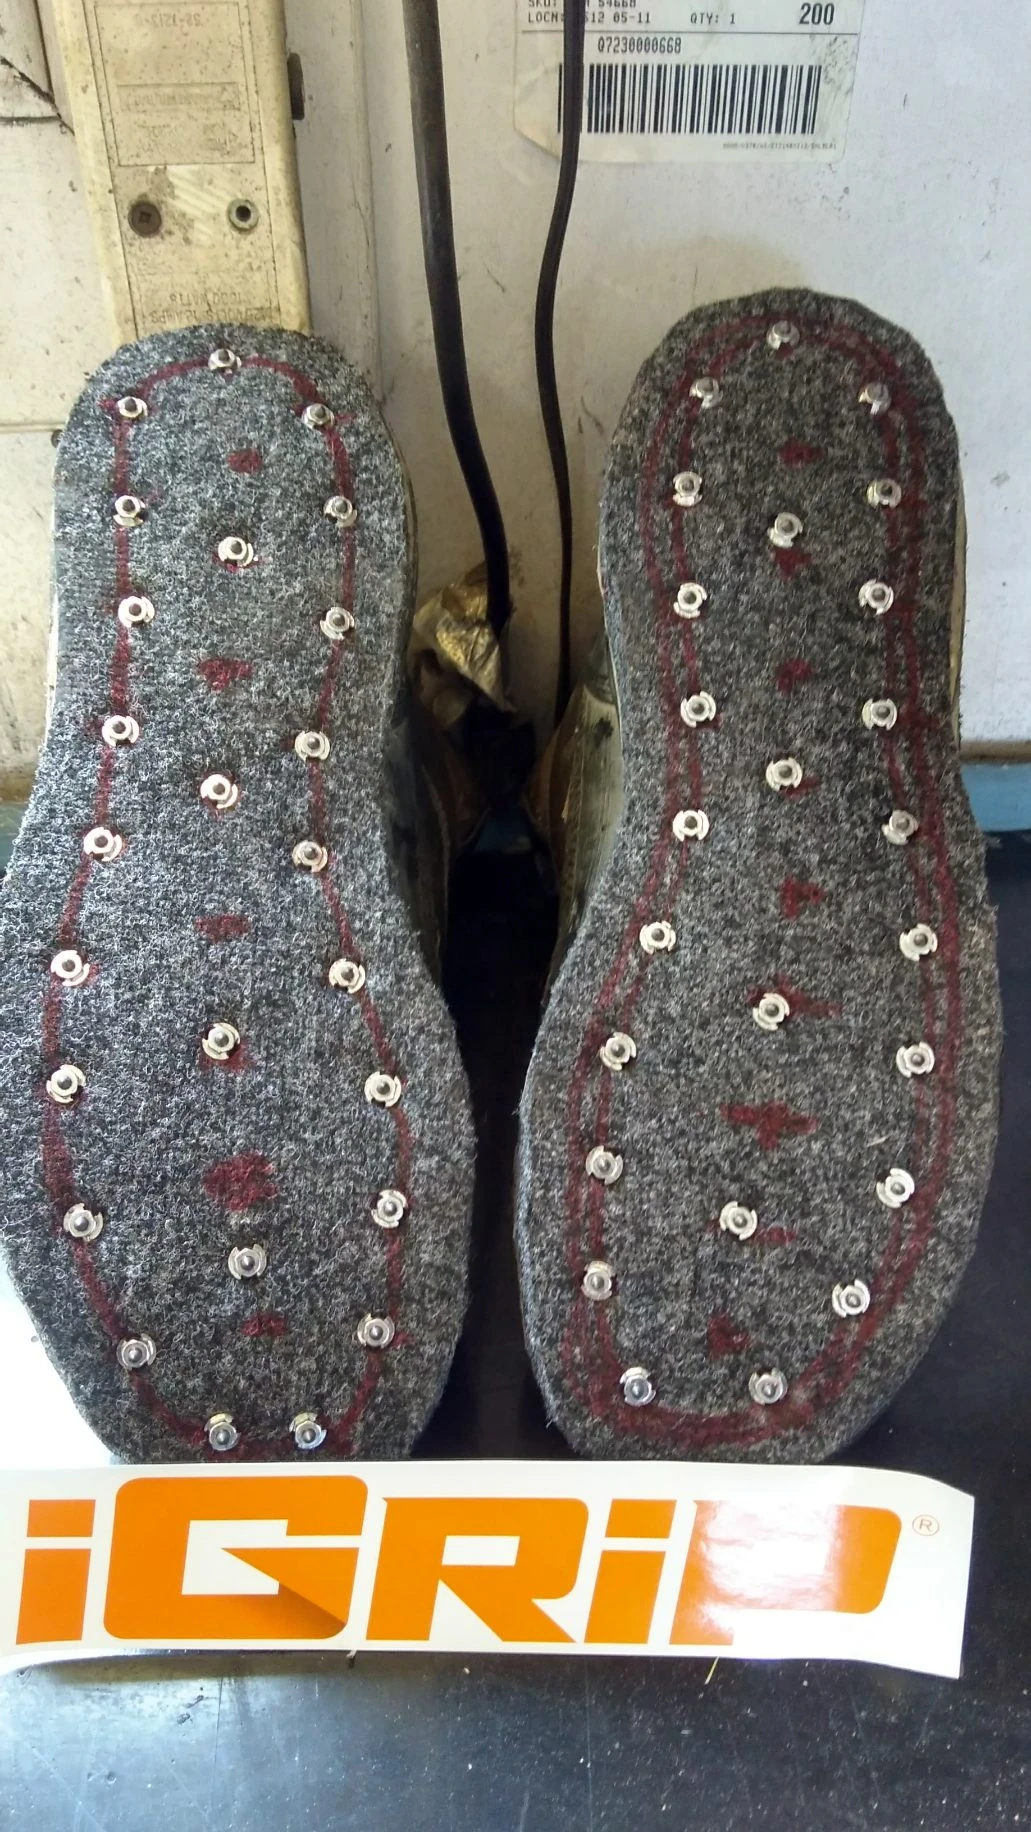
Recommended minimum: 12 per shoe / 24 per pair. The default layout places 6 studs in the forefoot and 6 in the heel, as illustrated in the official CAT/Royer photographs. The 8-stud option is below the recommended minimum. Choose 16 per shoe for additional contact points where suitable tread lugs allow. Adapt every position to a suitable tread lug on the actual sole.

Choose raised tread lugs

Place each stud on the top of a sound tread lug with verified depth. Keep its whole shoulder inside the lug’s edges. Balance the left and right sides of each shoe.

Leave weak areas alone

Avoid cracks, thin grooves, cavities, unsupported edges and the arch when it does not contact the ground. No universal edge distance was verified.

Let the sole set the limit

Shoe size and lug layout determine available locations. Aim for at least 12 studs per shoe, adding more where suitable tread lugs allow. Adapt every position to your actual soles.

See actual stud placement in the official footwear gallery +
Official iGrip CAT outsole photograph with six heel and six forefoot stud positions
CAT boot example · official iGrip gallery
Official iGrip Royer boot outsole with studs distributed in the heel and forefoot
Royer boot example · official iGrip gallery
BEFORE · UNSTUDDED SOLE
Unstudded outsole with raised tread lugsRaised outsole tread lugs are separated by dark recessed grooves. Every numbered stud position is centred on its own tread lug in the forefoot or heel. The arch and grooves have no stud positions.ARCH
AFTER · RECOMMENDED 12-STUD LAYOUT
Stud positions on raised tread lugsRaised outsole tread lugs are separated by dark recessed grooves. Every numbered stud position is centred on its own tread lug in the forefoot or heel. The arch and grooves have no stud positions.ARCH

05 / STEP-BY-STEP INSTALLATION

How to install
iGrip shoe studs.

Keep the instructions from your exact box beside you.
Model-specific preparation matters.

01

Inspect the outsole

Clean and dry it. Look for solid outsole tread lugs with room for the complete shoulder. Reject cracked, hollow, worn or visibly damaged fixing areas.

02

Measure each location

Establish continuous outsole rubber thickness from the ground-contact surface towards the shoe interior. Do not include foam, insoles, voids or protective components. If the structure is hidden, obtain the shoe manufacturer’s information.

03

Choose the model

Use the model’s insertion depth and add the 2 mm outsole reserve recommended from practical fitting experience. Check the footwear application and the instructions supplied with the exact model. Recheck thinner areas separately.

04

Mark a balanced pattern

Mark each proposed stud position on the top of a suitable raised tread lug. Keep the whole shoulder within the lug’s edges, clear of the recessed grooves. Distribute suitable lugs across the heel and forefoot and adapt the plan to both actual soles.

05

Prepare and engage the tool

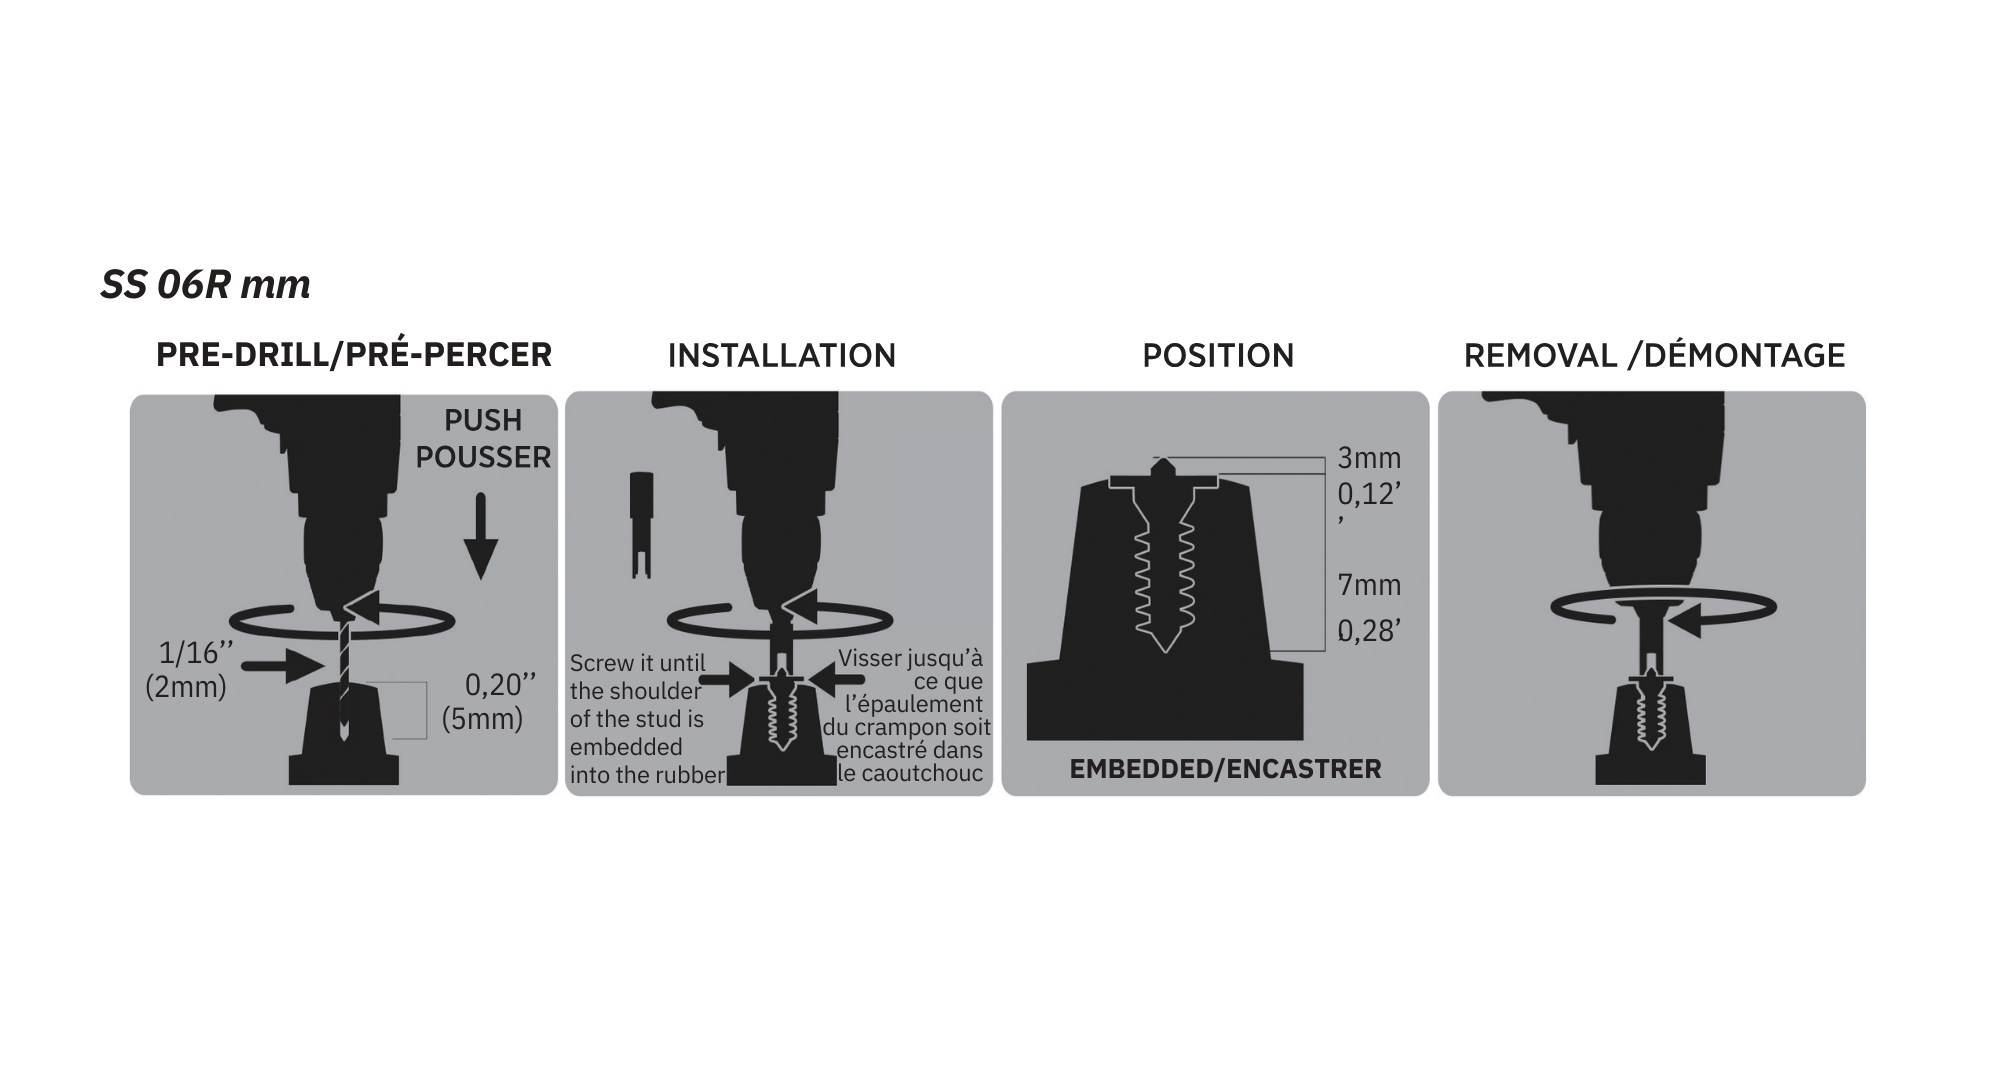
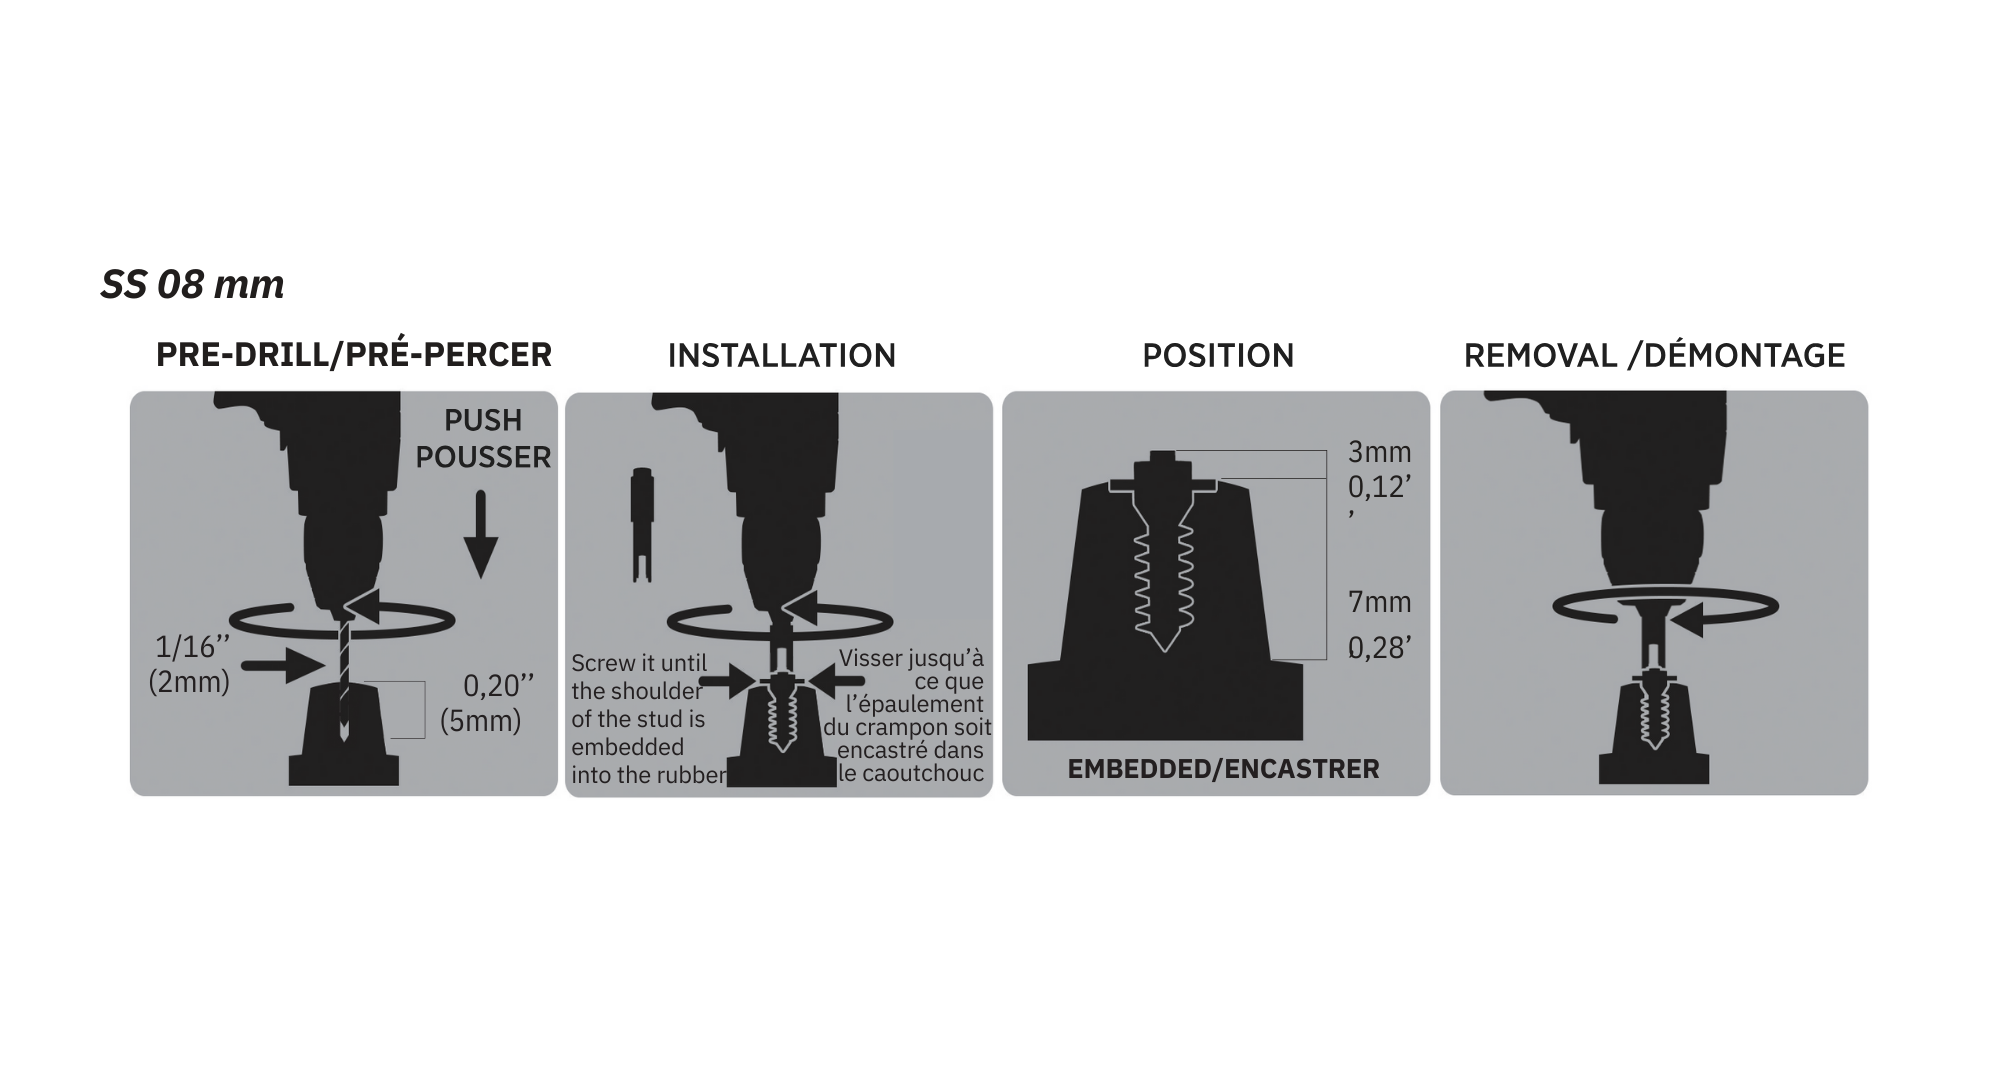
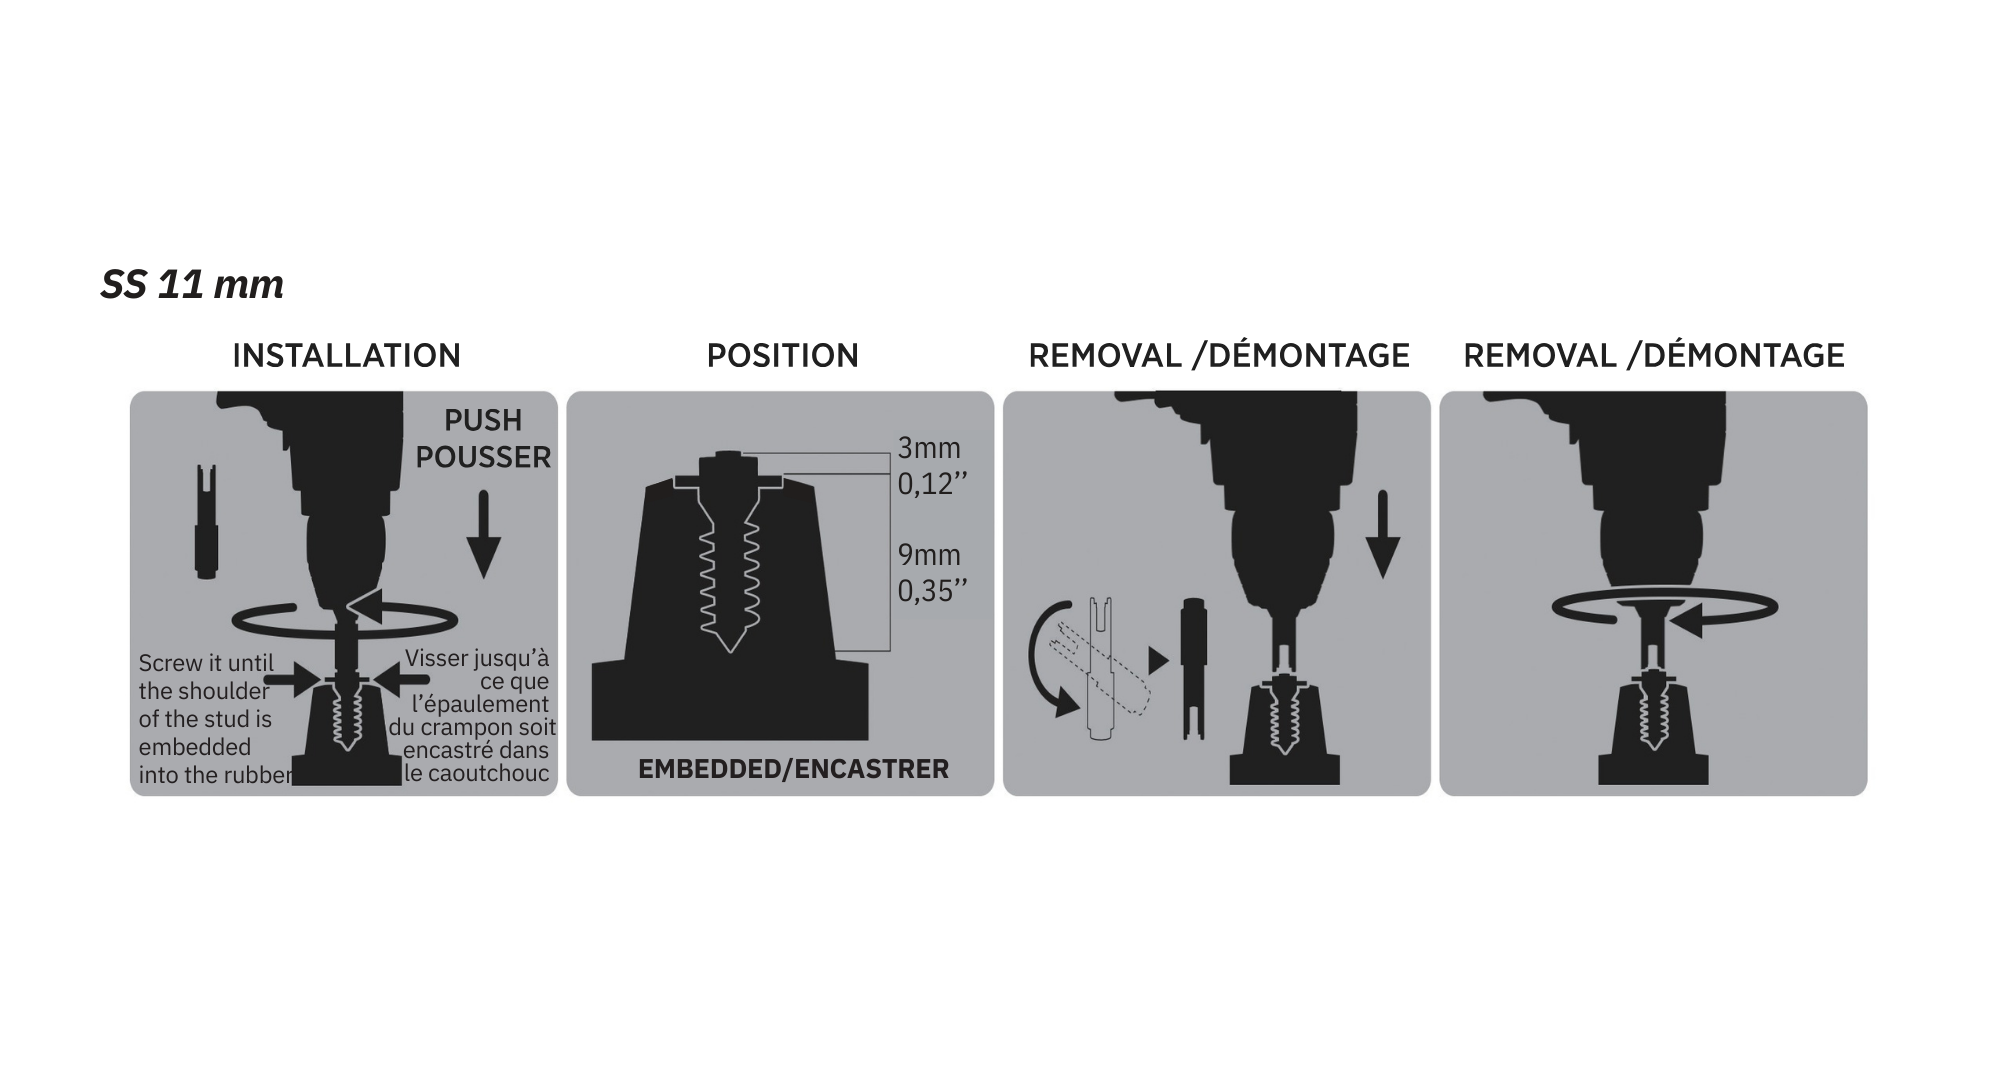
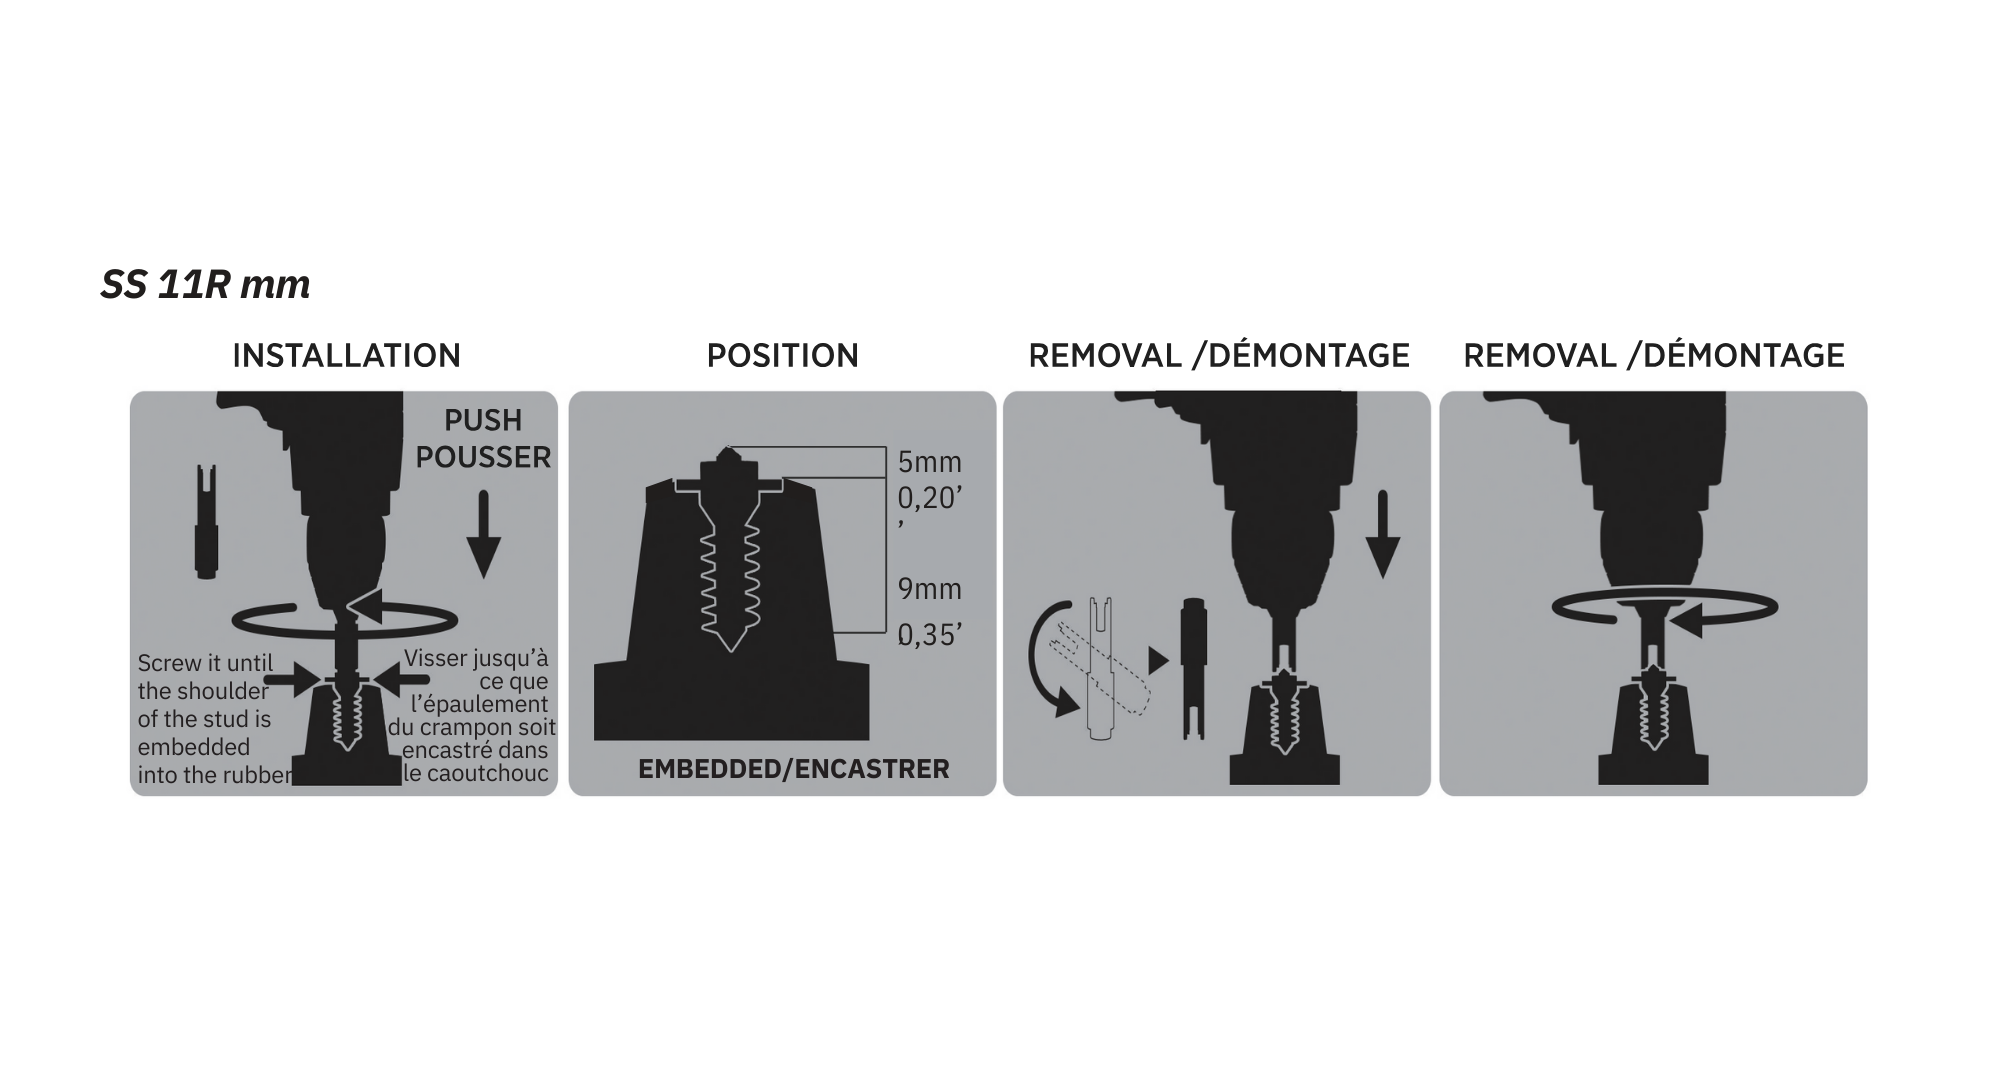
Use the model’s supplied iGrip installation bit. SS-06, SS-06R and SS-08 diagrams show a Ø2 mm pilot hole, 5 mm deep; SS-11 and SS-11R show no pilot step. Follow the current pack instructions and use controlled depth. Seat the stud securely in the fitting end.

06

Keep it perpendicular

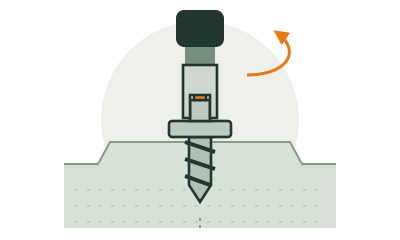
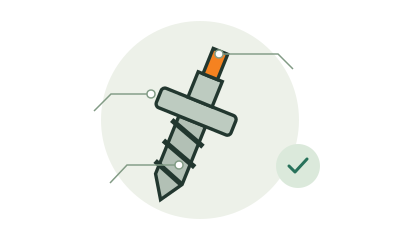
Align the stud with the local lug surface. Turn clockwise with control. Keep the shoe securely supported and your hands out of the tool path. Do not drive at an angle.

07

Seat the shoulder flush. Stop.

Embed the shoulder in the outsole rubber until its outer face is exactly flush with the surrounding outsole surface. The shoulder must not protrude. Stop there; do not drive it below the surface or compress and tear the lug.

08

Inspect before walking

Check alignment, seating, outsole rubber condition and secure retention. Compare both shoes. First try a few careful steps on a suitable outdoor surface; recheck the studs and inspect them regularly during use.

Correct perpendicular stud installation compared with an angled stud
Tap or click the diagram to enlarge. Align to the individual lug, which may slope relative to the rest of the sole.
Correct shoulder embedded with its outer face flush with the outsole surface, compared with a shoulder driven too deeply
Tap or click the diagram to enlarge. The shoulder sits inside the outsole. Its outer face is flush with the surrounding surface.

THE RIGHT TOOL

Use the bit supplied with your model.

The EU tool catalogue lists SS-080608 for 06 / 08 mm SS models and SS-322811 for 11 / 28 / 32 mm SS models. One tool listing contains conflicting body text, so verify R compatibility and replacement bits by exact model. Browse official tools ↗

Powered fitting

Official diagrams show a drill. Slow rotation, good alignment and a controlled final approach help you avoid overdriving. No universal RPM or torque setting is claimed.

Manual fitting

No separate universal hand-driver compatibility was verified. A normal screwdriver bit is not the shaped iGrip fitting tool. Ask iGrip before substituting a manual holder.

WATCH & INSTALL / SS-11R

SS-11R installation
video guide.

Watch the installation process, then follow the instructions supplied with your SS-11R studs.

Press play to watch here. Expand the player for a closer look.

Pilot holes, supplied tools and official installation resources +

SS-06, SS-06R and SS-08: official diagrams show a 2 mm pilot drill to 5 mm depth. SS-11 / SS-11R: the individual diagrams show fitting without a separate pilot step. Never infer a deeper pilot hole from the model number.

Official SS-11 installation and removal drawing showing the supplied fitting tool and its reversible ends
Official SS-11 fitting illustration. Check the instructions supplied with your exact model.

For SS-06, this guide uses the corrected product specification: 10 mm overall, 2 mm outside and 8 mm inserted. The linked older installation image shows an inconsistent 7 + 2 mm total. The other four models use their individual installation drawings. Follow the current pack’s instructions and ask iGrip if they differ.

SS-11 installation video ↗

06 / REMOVE & REUSE

Remove. Reuse.
Fit your next pair.

Made to last beyond one pair.
Unscrew your iGrip SS studs, give them a little care and take them into your next season.

  1. 01REMOVE
    Correct removal tool lifting a stud from the outsole rubber as it turns counterclockwise

    A few turns. Out it comes.

    Clear dirt from the head and fully engage the correct iGrip tool. Keep it aligned, turn counterclockwise and lift out the stud.

    Correct tool · controlled reverse rotation
  2. 02REFRESH
    Removed stud with its carbide tip, shoulder and thread highlighted for inspection

    A little care goes a long way.

    Clean the studs and inspect the threads, shoulder and carbide tip. Replace any worn or damaged studs; keep the rest clean and dry.

    Clean · inspect · store dry
  3. 03REUSE
    Reused stud installed in a new outsole rubber tread lug with the shoulder embedded flush with its surface

    Ready for the next pair.

    Check the new outsole: insertion depth + 2 mm of outsole rubber. Choose solid tread lugs and refit, seating the shoulder flush with the surface.

    Revisit the fitting steps

One set. More winters.

Durable studs you can transfer again and again to suitable shoes and boots.

Plan your next pair

Tool tip: SS-11 and SS-11R diagrams show a reversible, double-ended bit. Use the removal end specified for your model.

OUTSIDE, IN PRACTICE

Studs for running,
hiking, work and fishing.

Manufacturer examples show how varied suitable soles can be.
They are examples, not universal compatibility approvals.

FOR THE LOVE OF RUNNING

Keep running.
Through the icy months.

Extra grip for the miles you love.

iGrip studs are especially popular with people who love to run. Many runners tell iGrip that the studs have transformed their winter running, helping them feel more confident and keep doing what they love during the icy season.

A wide choice of stud models helps you find a fit for many different running shoes. Match the stud to the outsole rubber thickness and tread lugs of your particular pair, and make your favourite shoes ready for winter runs.

Find studs for my running shoes
A practical gift for loved ones.

Give extra winter grip to family members who walk, hike or work outdoors. A set of long-lasting, reusable iGrip SS studs is a thoughtful gift they can transfer to another suitable pair of shoes or boots.

OUTDOOR USE

Snow. Ice.
Wet, slippery terrain.

Grip still depends on the surface, outsole and stud condition. Studs do not eliminate the possibility of a fall.

INDOOR USE · CHECK THE FLOOR

Workplaces and homes.
Different floors.

Warehouses and workplaces: SS studs are used indoors on suitable, hard-wearing floors. Follow the requirements for the specific workplace.

At home: take extra care on sensitive floor finishes. Metal tips can mark some surfaces or slip on smooth finishes; choose footwear to suit the floor.

THE DETAILS, MADE SIMPLE

Shoe stud questions.
Practical answers.

Fit, quantity, tools and everyday use.

Still unsure? Ask iGrip ↗
What are iGrip SS shoe studs?

iGrip SS studs are removable screw-in traction studs for suitable shoe and boot outsoles. They combine a threaded anchor, a supporting shoulder and a carbide tip to add grip on ice and packed snow. Fit each stud into a raised tread lug, with the shoulder flush with the outsole surface. Choose the model by insertion depth and outsole thickness.

Which screw-in studs are best for my running shoes?

The best iGrip studs for your running shoes are the models that fit the outsole thickness and raised tread lugs at every installation point. Compare insertion depth, add the recommended 2 mm outsole reserve and check that each lug supports the whole shoulder. iGrip studs are among the most popular choices for runners worldwide. Start with 12 studs per shoe, 24 per pair.

Which iGrip stud should I use for my boots?

Start with verified, continuous outsole rubber thickness at every proposed fixing point. This guide screens the five SS models using insertion depth + 2 mm: 10 mm for SS-06; 9 mm for SS-06R and SS-08; 11 mm for SS-11 and SS-11R. Then check the model’s documented footwear application, the lug width and the current pack instructions. A thickness result alone does not certify a shoe as suitable.

What is the difference between SS-06 and SS-06R?

Both official drawings show 10 mm overall length, a 5.5 mm head and 2 mm carbide diameter. SS-06 has 2 mm of carbide above its metal head; SS-06R has a pointed 3 mm tungsten carbide tip. The R designation identifies the pointed carbide tip. SS-06 is listed for running/trekking shoes by the manufacturer; SS-06R is listed for safety boots by the EU store.

What is the difference between SS-11 and SS-11R?

SS-11 is 12 mm overall; SS-11R is 14 mm overall. Both have a 6 mm head and 2 mm carbide diameter. The carbide rises 1 mm above the SS-11 metal head and 3 mm above the pointed SS-11R head. The stud diameters are 4 and 4.5 mm respectively. Both enter the outsole rubber by 9 mm and therefore require at least 11 mm of outsole rubber in this guide; their installed projections outside the outsole are different (3 mm and 5 mm).

How thick must my shoe sole be?

Use the actual continuous outsole rubber thickness in the intended lug, excluding foam, cavities, insoles and internal components. The recommendation, based on practical fitting experience, is insertion depth + at least 2 mm of untouched outsole rubber. Insertion depth is overall length minus the complete installed projection outside the outsole. If thickness cannot be established reliably, ask iGrip or the footwear manufacturer before installing.

How many studs do I need per shoe?

iGrip’s recommended minimum is 24 studs per pair of shoes or boots — 12 studs per shoe. This matches the 24-stud packs available for footwear. Start with the recommended 12-stud layout shown here: 6 in the forefoot and 6 in the heel of each shoe. Adapt the exact positions to the raised tread lugs on your soles and check the outsole rubber thickness at every fixing point. The 8-stud layout is below the recommended minimum; the 16-stud layout adds more contact points where suitable tread lugs allow.

Where should studs be installed?

Install each stud into a raised tread lug — one of the solid outsole rubber blocks projecting from the outsole. Choose sufficiently wide, sound lugs in the heel and forefoot contact zones, with enough depth and room to support the whole shoulder. Avoid thin grooves, cracks, cavities, the unsupported edge and non-contact arch areas. Manufacturer footwear photos illustrate heel and forefoot layouts; the exact points must follow your outsole.

Should I install studs in both the heel and forefoot?

The manufacturer’s CAT and Royer footwear examples show studs in both regions. A balanced layout avoids relying on one small contact area. Heel contact and forefoot push-off vary with gait, so the diagrams are planning aids rather than a tested braking or climbing prescription.

Can I install iGrip studs myself?

Yes, iGrip supplies an installation tool and describes fitting and removal. First verify that your outsole is suitable, follow the instructions for the exact model and maintain control of the tool. Stop if the outsole rubber tears, the stud will not hold or the shoulder is being driven below the outsole surface. Stop when its outer face is flush with the surrounding outsole surface.

Do I need to pre-drill the sole?

The individual SS-06, SS-06R and SS-08 diagrams show a 2 mm pilot drill to 5 mm depth. SS-11 and SS-11R diagrams do not show a pilot-drilling step. Follow your current pack’s instructions and control drilling depth. Never make a test hole to discover whether a sole is thick enough.

Can I use a cordless drill?

The official fitting diagrams show a powered drill with the appropriate iGrip tool. Use slow, controlled rotation and a light final approach as practical fitting advice. No universal RPM or torque setting was verified. Do not treat an ordinary screwdriver tip as a substitute for the shaped iGrip bit.

Can iGrip studs be removed?

Yes. Clean the head, engage the appropriate removal end and reverse the tool. SS-11 and SS-11R diagrams show reversing the double-ended bit before removal. Unscrew counterclockwise, then inspect both the stud and the outsole rubber. An accessible shoulder/head makes tool engagement easier; damaged or buried heads may need specialist help.

Can the studs be reused?

Yes. iGrip studs are durable and can be reused again and again. You can unscrew them from one pair of shoes or boots and install the same studs in another pair when you change your footwear. Clean and inspect the studs before refitting, replace any that are worn or damaged, and check that the new outsole has suitable tread lugs and enough outsole rubber thickness for the selected model.

Can shoe studs damage the sole?

iGrip SS studs use a distinctive supporting shoulder to protect the outsole and keep the stud stable. When the correct model is installed in a suitable tread lug with the shoulder flush with the outsole surface, the shoulder prevents the stud from sinking deeper into the sole. Together with the threaded anchor, it limits movement and helps prevent loosening and pull-out. This is part of iGrip’s patented stud technology. Choose the right insertion depth and follow the fitting steps so the shoulder can do its job.

Are they suitable for work boots?

Yes. For many workers, iGrip SS studs are an essential part of their winter work boots. They add traction for outdoor work on ice and packed snow, while the SS shoulder supports a stable fit in the outsole. Choose the stud model by the outsole rubber thickness at each fixing point and install it in a suitable tread lug. The recommended minimum is 24 studs per pair — 12 per boot.

Are they suitable for hiking boots?

Yes. iGrip SS studs are especially well suited to winter hiking boots with suitable outsole tread lugs. A small investment in extra grip can make a big difference on icy trails. A fall can cost far more than a set of studs, making them a practical, thoughtful gift for family members who enjoy walking and hiking in winter. Choose the model to match the outsole thickness and follow the recommended minimum of 24 studs per pair — 12 per boot.

Are they suitable for rubber boots?

Yes. iGrip SS studs are a popular choice for rubber boots and fishing footwear with suitable rubber outsoles. Anglers value the extra grip when stepping over slippery rocks on riverbanks and while wading over submerged stones. Wet and algae-covered surfaces can be very slippery, making SS studs a useful addition to fishing boots. Choose the model to match the outsole thickness and fit each stud into a solid tread lug.

Can I walk indoors with studs?

Yes — indoor use depends on the floor surface. iGrip SS studs are used in warehouses and other workplaces with suitable, hard-wearing floors. Floors in homes are often more sensitive, so take extra care on wood, laminate, vinyl, tiles and polished surfaces. Metal tips can mark delicate finishes, and some smooth surfaces may be slippery. Check the grip and the floor’s suitability, follow workplace requirements, and change footwear where the surface calls for it.

Can I use different sizes in different parts of one sole?

Measure every proposed location separately. A thinner zone must meet the threshold for its own stud; if it does not, leave it unstudded or have the layout reassessed. Do not mix models solely by length: their installed protrusion differs. Ask iGrip to confirm any mixed-model layout before fitting.

Do more studs improve grip?

Even a few studs can provide extra grip on ice. For a regular footwear setup, follow iGrip’s recommended minimum of 24 studs per pair — 12 per shoe. You can add more studs for additional contact points, provided each one fits a solid tread lug with sufficient outsole rubber thickness and the layout stays balanced across the heel and forefoot.

Why add 2 mm to the insertion depth?

The +2 mm allowance is a recommendation based on practical fitting experience. It leaves at least 2 mm of untouched outsole rubber beyond the inserted end of the stud. Minimum outsole thickness = insertion depth + 2 mm; the part of the stud outside the sole is excluded. For example, SS-06 enters the outsole rubber by 8 mm, so the recommended minimum outsole thickness is 10 mm. Check each fixing point and follow the instructions for your model.

GET HELP WITH YOUR SOLE

Not sure which stud
fits your boots?

Send a shoe photo, a clear outsole photo, the boot model, verified outsole rubber depth and where you plan to use it. A photo helps identify the layout; it cannot prove hidden outsole rubber thickness.

Send us a photo of your sole ↗

Opens your email app. Attach the photos before sending.
Contact iGrip Europe ↗